


Introduction to Fashion Nails
Fashion nails are more than just a beauty trend—they’re a creative expression of personal style. Over the years, they’ve evolved into a global fashion phenomenon, with designs ranging from understated elegance to bold, artistic statements. Today, well-manicured nails are considered an essential accessory, completing any outfit and showcasing individuality.
Why are nails so important in fashion? Think about it—your hands are always on display, whether you’re shaking hands, holding a coffee cup, or scrolling through your phone. With countless colors, textures, and designs to choose from, fashion nails allow you to reflect your mood, personality, and even the season. Whether you’re rocking classic red nails or intricate nail art, the possibilities are endless.
History of Fashion Nails
The journey of nail art dates back thousands of years. Ancient Egyptians used henna to decorate their nails, while the Chinese created the first nail polish using beeswax, egg whites, and colored powders. Fast forward to the 20th century, and nails became a status symbol with the invention of modern nail polish.
Celebrities have always been trendsetters in nail fashion. From Marilyn Monroe’s signature red nails to the bold designs sported by Cardi B, their influence has shaped what’s popular. Today, social media platforms like Instagram and TikTok have brought nail art into the mainstream, making it accessible to everyone.
Types of Fashion Nails
Acrylic Nails
Acrylic nails are a go-to option for those looking for length and durability. Made by combining a liquid monomer with a powder polymer, these nails harden into a strong, customizable base. Acrylic nails are perfect for creating intricate designs or achieving a dramatic look. However, they require regular maintenance, and improper removal can weaken natural nails.
Gel Nails
Gel nails offer a more natural appearance than acrylics. Applied in layers and cured under UV or LED light, gel nails are flexible, lightweight, and long-lasting. They’re ideal for those who prefer a glossy finish and minimal upkeep. The only downside? Gel nails can be tricky to remove without professional help.
Dip Powder Nails
Dip powder nails are a hybrid of acrylic and gel nails. The process involves dipping your nails into a colored powder and sealing it with a clear topcoat. They’re praised for their durability and quick application process. Plus, dip powder nails are less damaging than traditional acrylics, making them a popular choice.
Natural Nail Styles
For those who prefer simplicity, natural nail styles are the way to go. A fresh coat of clear polish or subtle nude shades can make a big statement. Minimalistic designs, like thin stripes or tiny dots, add a touch of sophistication without overwhelming your look.
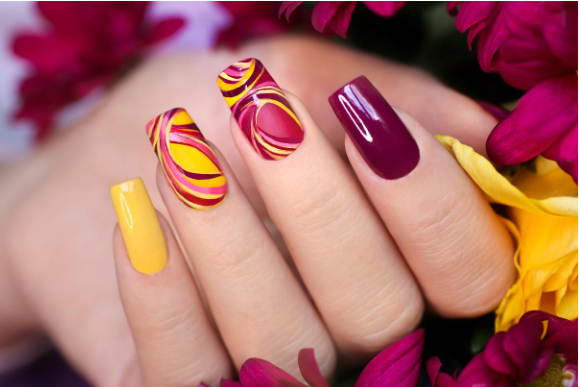
Trending Nail Art Designs
Fashion nails are constantly evolving, with new trends popping up every season. Some of the hottest designs right now include:
- Minimalist Art: Simple lines, negative space, and muted colors are all the rage.
- Geometric Patterns: Sharp angles and bold shapes create a modern aesthetic.
- Glitter and Holographic Nails: Perfect for adding sparkle and catching the light.
- Floral and Abstract Designs: From dainty flowers to freehand abstract art, these designs are great for showcasing creativity.
- Seasonal Themes: Think snowflakes for winter or pastel hues for spring.
Each design allows you to express your personality and adapt your nails to fit the occasion.
Step 2: Choosing the Right Nail Style to DIY Fashion Nails at Home
Choosing the Right Nail Style for You
When it comes to fashion nails, finding the right style is essential to match your personality, lifestyle, and occasion. Not all nail designs are created equal, and what works for someone else might not suit you. Here’s how to narrow it down:
- Lifestyle: Are you constantly typing on a keyboard, working with your hands, or taking care of kids? If yes, you might want to avoid overly long or dramatic nails that are prone to breakage. Opt for shorter styles or rounded shapes that are less likely to snag or chip.
- Occasion: Going to a wedding? Try elegant designs with neutral tones, rhinestones, or glitter accents. For a casual everyday look, minimalist designs like pastel shades or French tips are perfect.
- Durability Needs: If you’re someone who wants your nails to last a long time, consider gel or dip powder nails. These styles are less likely to chip and are ideal for low-maintenance nail lovers.
By aligning your nail style with your personal needs, you’ll end up with nails that not only look great but are practical for your daily routine.
Nail Shapes and Their Impact on Style
The shape of your nails can completely transform the overall look of your hands. Let’s break down the most popular nail shapes and what they convey:
- Oval Nails: A timeless and elegant option, oval nails elongate the fingers and work well for both long and short nail beds.
- Square Nails: These have a flat tip with sharp corners, offering a clean, bold appearance. Perfect for those who want a classic and sturdy look.
- Almond Nails: With tapered sides and a rounded tip, almond nails exude sophistication and femininity.
- Stiletto Nails: These sharp, pointy nails are dramatic and eye-catching but can be less practical for everyday use.
- Coffin/Ballerina Nails: Resembling the shape of a coffin or ballerina slipper, these are trendy and work well for long nails.
Choosing the right shape depends on your hand structure and the statement you want to make. For instance, oval nails are universally flattering, while stiletto nails are for those who want to make a bold fashion statement.
DIY Fashion Nails at Home
Creating salon-quality nails at home might seem intimidating, but it’s easier than you think. With the right tools and techniques, you can achieve stunning results without breaking the bank.
Essential Tools for DIY Nail Art
To start, you’ll need a basic nail kit that includes:
- Nail clippers and a file for shaping.
- A cuticle pusher and nippers for clean edges.
- A buffing block for a smooth surface.
- Base coat, top coat, and your favorite nail polish shades.
- Nail art brushes, dotting tools, and stickers for added creativity.
Step-by-Step Guide for Beginners
- Prep Your Nails: Start by cleaning your nails and pushing back the cuticles. Trim and file them into your desired shape.
- Apply a Base Coat: This step protects your natural nails and creates a smooth surface for the polish.
- Add the Color: Apply thin layers of your chosen nail polish, letting each layer dry before adding the next. This prevents smudging and ensures a long-lasting finish.
- Create the Design: Use nail art tools to add patterns, glitter, or decals. For beginners, start with simple designs like polka dots or stripes.
- Seal with a Top Coat: A good top coat adds shine and protects your nail art from chipping.
Common Mistakes to Avoid
- Applying thick coats of polish, which take longer to dry and are prone to smudging.
- Skipping the base or top coat, which can result in shorter-lasting designs.
- Neglecting cuticle care, which can make even the best designs look messy.
DIY nails are not only budget-friendly but also a fun way to express yourself creatively. Practice makes perfect, so don’t be afraid to experiment!